 Let’s make life easier! By spending two weeks solving a problem that takes a few minutes to solve each time :P
Throughout my travels across East Asia and South America I created many Instagram stories, that my followers surely enjoyed, however, one annoyance I had was that stories can only be sixty seconds long. Now, my regaling of facts and observations of cultural phenomena can’t be held seldom to such a constraint. So I had to manually cut my videos to instances of sixty seconds each; A tedious task. And thus gives birth to my Instagram Story Cutter project! This post covers my path to creating this project and how it is made.
Starting Simple
I often have grand ideas for application projects but then never finish them, because it takes too long to get something that gives tangible benefit. NOT THIS TIME! I’m keeping the requirements simple.
Hard Requirements:
- An app that takes a video and cuts it into sixty second clips
- Do it right! Well structured code, with automated unit tests run in continuous integration
- That’s it!
Some stretch goals if they come by easily
- Remove any silence at the start of the first clip
In order to keep any scope creep from coming in I decided to leave this first iteration of the app as a commandline utility. I thought writing in Python would be sensible, so that I’m not trying out too many new technologies at once, whilst sprucing up on my Python knowledge.

Decisions, Decisions!
As with any project, there are many permutations one can take to solve the problem. So I’m outlining some of the options I found and why I chose the ones that I ended up using.
CLI Module
There is a wide plethora of different packages one can choose for implementing their command line interface (CLI). My main objective was minimize on the boiler plate code and let the package do the work for me.
The standard library approach
This requires the most code to get a CLI that is fully functional. This is with good reason though, it gives the most flexibility and fundamentally any other CLI package will be using the standard library methods underneath. It also means that you don’t require any packages as dependencies and it will be maintained as long as Python remains relevant as a language. But it didn’t fit my mantra for simplistic code so let’s move one.
Click
A very nice package that uses decorators on functions to define the CLI usage. I’ve used click in the past and been very happy with it. It’s still explicit in it’s configuration so there isn’t much hidden away from the developer, and it bundles in a bunch of the standard options that you would want your CLI to have, like setting up help text automatically. But it just didn’t scratch that simplicity itch enough.
Typer
In comes Typer! Lord of simplicity, king of the lazy CLI developer. With a single import and a slight adjustment in the __name__ function and Bob’s your uncle. A fully functioning CLI with arguments based on the internal python function. NO BOILERPLATE NEEDED! This was the winner for me and although I could see the lack of explicit configuration being slightly less readable or obvious for another developer in the future, I think it was worth it for this small individual project.
So this simple code:
import typer

def main(file_path: str) -> None:
  return

if __name__ == '__main__':
  typer.run(main)
Gives you all this:
python instagram_story_cutter/__init__.py --help
INFO:root:Starting Instagram Story Cutter application

 Usage: __init__.py [OPTIONS] FILE_PATH

╭─ Arguments ─────────────────────────────────────────────────────────────────────────────────────────────────────────────────────────────────╮
│ *    file_path      TEXT  [default: None] [required]                                                                                        │
╰─────────────────────────────────────────────────────────────────────────────────────────────────────────────────────────────────────────────╯
╭─ Options ───────────────────────────────────────────────────────────────────────────────────────────────────────────────────────────────────╮
│ --help          Show this message and exit.                                                                                                 │
╰─────────────────────────────────────────────────────────────────────────────────────────────────────────────────────────────────────────────╯
Video editing in Python
Audio and video manipulation is complex. Not only are there many different formats of video and audio encoding, but there are also all the many different ways of combining those various components together with different metadata, compression and compatability. Also, what you want to do with all those options can vary a lot dependent on use case so choosing the best python package for me took some experimentation and learning.
OpenCV
OpenCV is often mentioned for video manipulation however most tutorials revolve around the use of this library to create videos by capturing from a camera. So it appears to be more for computer vision use cases and video analysis rather than standard video editing. Useful for certain applications and I’m glad I’ve discovered it but not right for this project.
MoviePy
MoviePy initially seemed like a great option. Plenty of other people use it and the usage is quite intuitive. However, I came across an issue where the video would come out the wrong aspect ratio. I thought I would check the issues to see if this is a bug that has been raised and it has cropped up multiple times in moveipy’s history but hasn’t been fixed in all cases. Looking a bit deeper there are are a lot of conversations about the future of the project and it doesn’t have a clear one. There haven’t been many contributions and the ones that do exist are far and few between. So I decided against MoviePy.
An aside about FFmpeg
Most automated video editing is done using a command line utility called FFmpeg, an open-source project that is committed to the editing of all encodings of audio and video, funded by SPI (Software in the public interest) a non-profit organisation. It’s a cool project and I have considered using it directly for this project but I didn’t like the idea of having a binary checked in as a dependency for the project and wanted to keep dependency management as pip packages if possible. Having said that most modules use FFmpeg under the hood, including MoviePy, which uses it by proxy of it’s dependency to imageiopy. Anyhow, I guess I’m saying FFmpeg is almost inevitable when it comes to automated video editing.
py-ffmpeg
This is a very direct use of FFmpeg. Essentially just running FFmpeg commands through python functions. This is quite simplistic and for installation it requires you to install FFmpeg independently. Thus making the package somewhat redundant as I would likely just write my own functions instead of relying on another module.
PyAV
This takes a slightly different approach. By compiling this module using Cython, it creates binding to the FFmpeg libraries that means there is no need to install FFmpeg yourself but you are locked to the version of FFmpeg that it was compiled with.
The PyAV documentation does also say “If the ffmpeg command does the job without you bending over backwards, PyAV is likely going to be more of a hindrance than a help.”. However, the way that PyAV conceptualises the workflow of FFmpeg made it compelling as you understand what is happening with your video and audio files. It also means I don’t have to install FFmpeg separately.
I will say that the documentation is somewhat sparse and it is not intuitive. I got a lot further by following this guide on how FFmpeg works. I will briefly explain the important part below.
With power of ChatGPT, I also made more progress. I will go through my thoughts on how useful AI was for my project in another post in the future so stay tuned for that!
How it all works together!
How FFmpeg works
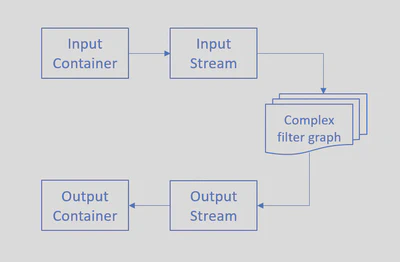
There are four key concepts that are FFmpeg specific, that are necessary to understand how to use PyAV:
Streams:
These are individual analog to digital encoded items. Such an audio track encoded in mp3 or some video encoded using the h.264 encoder.
Containers:
These are combinations of streams put together. The most common form or these is an audio track and video clip together, e.g. mp4.
Filters:
These are essentially functions run on a stream that edit it in some way. An example would be adding a green hue to a video stream or increasing the volume of an audio stream by three decibels.
Graphs:
A graph is a combination of filters that sequentially run on a stream and output another stream to be placed into a container. This could just be a single filter or many filters.
So when you are using PyAV you always start with an input container. You locate the stream you are interested in. Create your filter objects and then create your graph. Then configure the graph with the stream to get your output and create an output container. The flow of logic looks broadly like this:

How my code works
In the end I couldn’t get the filters functionality to work and I wanted to get this project out the door. Luckily cutting video clips doesn’t require filters, at some cost of precision for your cuts but it will be unlikely to cause notable issues. Instead I look at the video frames and then cut the video at the frame just before the sixty seconds should be up, and then use that frame as the point for the next clip and do the same thing.
This has a couple of advantages. It doesn’t require using filters, which aren’t documented well for use with PyAV. And it doesn’t have to decode and encode the streams, which is much more performant.
How the code is tested
I chose pytest as my unit testing framework and as I was trying to keep this project simpler I only tested the main code line but this will actually cover a large amount of the code paths. There are some dependencies for testing this project as the application requires video clips. So I stored two clips in a GCP bucket, one clip that is less than sixty seconds in length and one that is more than sixty seconds. This allows for testing that the code doesn’t fail if the video clip is already the correct length and verify that multiple clips are created in a more normal use case. I then created a script for downloading these files and a pytest fixture that will automatically run that script when the relevant tests are run. I then added a job in the CI file that runs the defined tests every time there is a commit and creates a report file which can be used for code coverage tracking.
Future Roadmap
Now that I have a base project to work from I’ll be looking to make improvements iteratively and writing posts to cover each of them! Here is a little sneak peek of what’s coming down the pipeline:
- Conversion into a Web Application
- Infrastructure deployed through Infrastructure as code
- Increased functionality to remove silence and reduce noise in videos
- A mobile application (this would be a major stretch goal)
Conclusions
I’ve definitely improved my python knowledge in this project and I’m actually quite proud of the outcome as it really does what I sought out and I was disciplined in not letting scope creep take over. I enjoyed the new concepts and tooling I’ve discovered and believe that I’ve become a more well-rounded technologist because of it.